
今天分享的文章是来自小米的Cheeeelok同学,本文主要从系统源码的角度带你一步步了解Android Input子系统。今天是周六,不知道有多少同学周末还会看技术文章呢?觉得文章不错,可以打赏或转发,文章的打赏将归作者所有。
原文地址:https://zhuanlan.zhihu.com/p/29152319
从我个人的理解来看,Android的Input系统其实就是系统级的事件处理、分发框架,它需要的功能模块大致有:事件读取、事件分类、事件分发。那么我们就从整个Input系统的输入源入手,了解事件是如何被输入到Input系统中的。
在看代码前我们先想一想,如果要我们设计一个事件分发框架的输入读取模块,要考虑到哪些子模块:
- 事件生成模块(当用户对设备进行操作产生InputEvent,硬件产生中断将事件交给驱动,驱动交给内核,内核交给framework)
- 事件监听模块(这里就很像设计一个服务器,为了及时响应来自客户端的请求,则需要启动一个线程监听)
- 事件读取模块
- 事件分发模块
那么现在我们最起码可以知道整个学习的起点了,就是Input系统中,负责监听的线程是谁,监听的过程中它们做了什么。在开始之前,给大家分享一张我根据本文内容画的图:
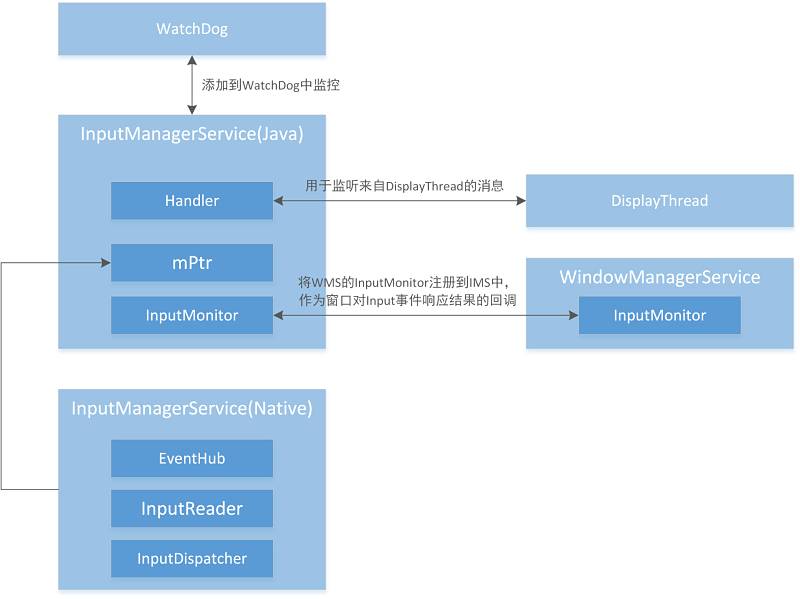
InputManagerService初始化概览
首先,有几点共识我们都可以达成:
- Android Framework层的Service(Java)都是由system_server进程创建的(由于没有fork,因此都运行在system_server进程中)
- Service创建后就会交给运行在system_server进程中的ServiceManager管理。
因此对于InputManagerService的创建,我们可以在SystemServer的startOtherServices()方法中找到,该方法做了以下事情:
- 创建InputManagerService对象
- 将它交给ServiceManager管理
- 将WindowManagerService的InputMonitor注册到InputManagerService中作为窗口响应事件后的回调
- 完成以上工作后启动InputManagerService。
SystemServer.javastartOtherServices(){
    ……
    inputManager = new InputManagerService(context);
    ……
    inputManager.setWindowManagerCallbacks(wm.getInputMonitor());
    inputManager.start();
    ……
}
接下来我们就逐部分学习相应的处理。
InputManagerService对象的创建
创建InputManagerService对象时会完成以下工作:
- 创建一个负责处理DisplayThread线程中的Message的Handler
- 调用nativeInit初始化native层的InputManagerService,初始化的时候传入了DisplayThread的消息队列
- 用mPtr保存native层的InputManagerService
- 初始化完成后将Service添加到LocalServices,通过Map以键值对的形式存储
InputManagerService.javapublic InputManagerService(Context context) {    this.mContext = context;    this.mHandler = new InputManagerHandler(DisplayThread.get().getLooper());

    mUseDevInputEventForAudioJack =
            context.getResources().getBoolean(R.bool.config_useDevInputEventForAudioJack);
    Slog.i(TAG, "Initializing input manager, mUseDevInputEventForAudioJack="
            + mUseDevInputEventForAudioJack);
    mPtr = nativeInit(this, mContext, mHandler.getLooper().getQueue());

    LocalServices.addService(InputManagerInternal.class, new LocalService());
}
这里可能有人就会问了,为什么InputManagerService要和DisplayThread绑定在一起?大家不妨想想,InputEvent无论如何被获取、归类、分发,最终还是要被处理,也就意味着最终它的处理结果都要在UI上体现,那么InputManagerService自然要选择和UI亲近一些的线程在一起了。
但是问题又来了,应用都是运行在自己的主线程里的,难道InputManagerService要一个个绑定么,还是一个个轮询?这些做法都太过低效,那换个办法,可不可以和某个管理或非常亲近所有应用UI的线程绑定在一起呢?
答案是什么,我在这里先不说,大家可以利用自己的知识想想。
初始化native层的InputManagerService
在nativeInit函数中,将Java层的MessageQueue转换为native层的MessageQueue,然后再取出Looper用于NativeInputManager的初始化。可见这里的重头戏就是NativeInputManager的创建,这个过程做了以下事情:
- 将Java层的Context和InputManagerService转换为native层的Context和InputManagerService存储在mContextObj和mServiceObj中
- 初始化变量
- 创建EventHub
- 创建InputManager
com_android_server_input_InputManagerService.cpp

NativeInputManager::NativeInputManager(jobject contextObj,
        jobject serviceObj, const sp<Looper>& looper) :
        mLooper(looper), mInteractive(true) {
    JNIEnv* env = jniEnv();

    mContextObj = env->NewGlobalRef(contextObj);
    mServiceObj = env->NewGlobalRef(serviceObj);

    {        AutoMutex _l(mLock);
        mLocked.systemUiVisibility = ASYSTEM_UI_VISIBILITY_STATUS_BAR_VISIBLE;
        mLocked.pointerSpeed = 0;
        mLocked.pointerGesturesEnabled = true;
        mLocked.showTouches = false;
    }
    mInteractive = true;

    sp<EventHub> eventHub = new EventHub();
    mInputManager = new InputManager(eventHub, this, this);
}
EventHub
看到这里很多人就会想,EventHub是什么?取英语释义来看,它的意思是事件枢纽。我们在文章开头的时候也提到过,Input系统的事件来源于驱动/内核,那么我们可以猜测EventHub是处理来自驱动/内核的元事件的枢纽。接下来就在源码中验证我们的想法吧。
EventHub的创建过程中做了以下事情:
- 创建mEpollFd用于监听是否有数据(有无事件)可读
- 创建mINotifyFd将它注册到DEVICE_PATH(这里路径就是/dev/input)节点,并将它交给内核用于监听该设备节点的增删数据事件。那么只要有数据增删的事件到来,epoll_wait()就会返回,使得EventHub能收到来自系统的通知,并获取事件的详细信息
- 调用epoll_ctl函数将mEpollFd和mINotifyFd注册到epoll中
- 定义int wakeFd[2]作为事件传输管道的读写两端,并将读端注册到epoll中让mEpollFd监听
EventHub.cpp

EventHub::EventHub(void) :
        mBuiltInKeyboardId(NO_BUILT_IN_KEYBOARD), mNextDeviceId(1), mControllerNumbers(),
        mOpeningDevices(0), mClosingDevices(0),
        mNeedToSendFinishedDeviceScan(false),
        mNeedToReopenDevices(false), mNeedToScanDevices(true),
        mPendingEventCount(0), mPendingEventIndex(0), mPendingINotify(false) {
    acquire_wake_lock(PARTIAL_WAKE_LOCK, WAKE_LOCK_ID);

    mEpollFd = epoll_create(EPOLL_SIZE_HINT);
    LOG_ALWAYS_FATAL_IF(mEpollFd < 0, "Could not create epoll instance.  errno=%d", errno);

    mINotifyFd = inotify_init();
    int result = inotify_add_watch(mINotifyFd, DEVICE_PATH, IN_DELETE | IN_CREATE);
    ……
    result = epoll_ctl(mEpollFd, EPOLL_CTL_ADD, mINotifyFd, &eventItem);
    ……
    int wakeFds[2];
    result = pipe(wakeFds);
    ……
    mWakeReadPipeFd = wakeFds[0];
    mWakeWritePipeFd = wakeFds[1];

    result = fcntl(mWakeReadPipeFd, F_SETFL, O_NONBLOCK);
    ……
    result = fcntl(mWakeWritePipeFd, F_SETFL, O_NONBLOCK);
    ……
    result = epoll_ctl(mEpollFd, EPOLL_CTL_ADD, mWakeReadPipeFd, &eventItem);
    ……
}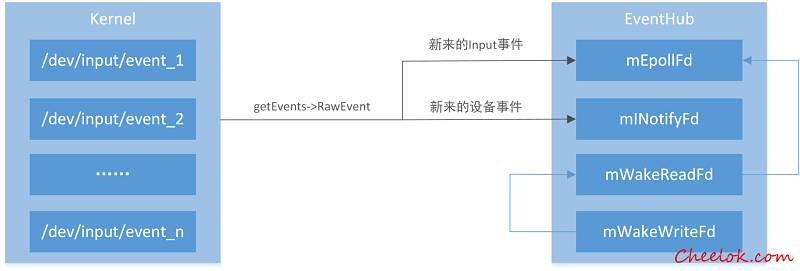
那么这里抛出一个问题:为什么要把管道的读端注册到epoll中?假如EventHub因为getEvents读不到事件而阻塞在epoll_wait()里,而我们没有绑定读端的话,我们要怎么唤醒EventHub?如果绑定了管道的读端,我们就可以通过向管道的写端写数据从而让EventHub因为得到管道写端的数据而被唤醒。
InputManager的创建
接下来继续说InputManager的创建,它的创建就简单多了,创建一个InputDispatcher对象用于分发事件,一个InputReader对象用于读事件并把事件交给InputDispatcher分发,,然后调用initialize()初始化,其实也就是创建了InputReaderThread和InputDispatcherThread。
InputManager.cpp

InputManager::InputManager(        const sp<EventHubInterface>& eventHub,        const sp<InputReaderPolicyInterface>& readerPolicy,        const sp<InputDispatcherPolicyInterface>& dispatcherPolicy) {
    mDispatcher = new InputDispatcher(dispatcherPolicy);
    mReader = new InputReader(eventHub, readerPolicy, mDispatcher);
    initialize();
}void InputManager::initialize() {
    mReaderThread = new InputReaderThread(mReader);
    mDispatcherThread = new InputDispatcherThread(mDispatcher);
}
InputDispatcher和InputReader的创建都相对简单。InputDispatcher会创建自己线程的Looper,以及设置根据传入的dispatchPolicy设置分发规则。InputReader则会将传入的InputDispatcher封装为监听对象存起来,做一些数据初始化就结束了。
至此,InputManagerService对象的初始化就完成了,根据开头说的,接下来就会调用InputManagerService的start()方法。
监听线程InputReader和InputDispatcher的启动
在start()方法中,做了以下事情:
- 调用nativeStart方法,其实就是调用InputManager的start()方法
- 将InputManagerService交给WatchDog监控
- 注册触控点速度、显示触控的观察者,并注册广播监控它们
- 主动调用updateXXX方法更新(初始化)
InputManagerService.javapublic void start() {
    Slog.i(TAG, "Starting input manager");
    nativeStart(mPtr);    // Add ourself to the Watchdog monitors.
    Watchdog.getInstance().addMonitor(this);

    registerPointerSpeedSettingObserver();
    registerShowTouchesSettingObserver();
    registerAccessibilityLargePointerSettingObserver();

    mContext.registerReceiver(new BroadcastReceiver() {        @Override
        public void onReceive(Context context, Intent intent) {
            updatePointerSpeedFromSettings();
            updateShowTouchesFromSettings();
            updateAccessibilityLargePointerFromSettings();
        }
    }, new IntentFilter(Intent.ACTION_USER_SWITCHED), null, mHandler);

    updatePointerSpeedFromSettings();
    updateShowTouchesFromSettings();
    updateAccessibilityLargePointerFromSettings();
}
显而易见这里最值得关注的就是InputManager的start()方法了,可惜这个方法并不值得我们如此关心,因为它做的事情很简单,就是启动InputDispatcherThread和InputReaderThread开始监听。
status_t InputManager::start() {
    status_t result = mDispatcherThread->run("InputDispatcher", PRIORITY_URGENT_DISPLAY);    if (result) {
        ALOGE("Could not start InputDispatcher thread due to error %d.", result);        return result;
    }

    result = mReaderThread->run("InputReader", PRIORITY_URGENT_DISPLAY);    if (result) {
        ALOGE("Could not start InputReader thread due to error %d.", result);

        mDispatcherThread->requestExit();        return result;
    }    return OK;
}
那么InputReaderThread线程是怎么和EventHub关联起来的呢?
对于InputReadThread:
- 启动后循环执行mReader->loopOnce()
- loopOnce()中会调用mEventHub->getEvents读取事件
- 读到了事件就会调用processEventsLocked处理事件
- 处理完成后调用getInputDevicesLocked获取输入设备信息
- 调用mPolicy->notifyInputDevicesChanged函数利用InputManagerService的代理通过Handler发送MSG_DELIVER_INPUT_DEVICES_CHANGED消息,通知输入设备发生了变化
- 最后调用mQueuedListener->flush(),将事件队列中的所有事件交给在InputReader中注册过的InputDispatcher
bool InputReaderThread::threadLoop() {
    mReader->loopOnce();    return true;
}void InputReader::loopOnce() {
    ……

    size_t count = mEventHub->getEvents(timeoutMillis, mEventBuffer, EVENT_BUFFER_SIZE);

    { // acquire lock
        AutoMutex _l(mLock);
        mReaderIsAliveCondition.broadcast();        if (count) {
            processEventsLocked(mEventBuffer, count);
        }

    ……        if (oldGeneration != mGeneration) {
            inputDevicesChanged = true;
            getInputDevicesLocked(inputDevices);
        }
    } // release lock

    // Send out a message that the describes the changed input devices.
    if (inputDevicesChanged) {
        mPolicy->notifyInputDevicesChanged(inputDevices);
    }

    ……
    mQueuedListener->flush();
}
至此,Input系统有关事件输入模块的学习就结束了,在后续的文章中会继续学习Input系统的事件归类、分发流程,感兴趣的朋友可以留意关注。


- 随机文章
标签云集
-
android
ui设计
前端开发
iphone x
k8s
webpack
nginx
mysql优化
设计灵感
ios
页面设计
logo
大数据可视化
vue
树莓派
zabbix
前端技术
APP UI设计
移动端识别
python
MySQL小知识
app设计
javascript
linux
electron开发
jupyter
交互设计
docker命令
docker
golang小技巧
PHP小技巧
python插件
JavaScript小技巧
php
Java
分布式
vue小技巧
Redis
网页设计
docker的使用
图标设计
docker小技巧
adobe
swoole
数据库
APP设计参考
mysql
react
css
设计教程


