
前言
上次我们讲了一篇文章彻底搞懂Android事件分发机制,这次我们来看看自定义View控件,在Android应用开发过程中,固定的一些控件和属性可能满足不了开发的需求,所以在一些特殊情况下,我们需要自定义控件与属性,同样,这也是面试中面试官问的几率比较高的问题,也是由初级工程师通向中高级工程师必备的。
一、实现步骤
1. 继承View类或其子类
2. 复写view中的一些函数
3. 为自定义View类增加属性(两种方式)
4. 绘制控件(导入布局)
5. 响应用户事件
6. 定义回调函数(根据自己需求来选择)
二、哪些方法需要被重写
onDraw()
view中onDraw()是个空函数,也就是说具体的视图都要覆写该函数来实现自己的绘制。对于ViewGroup则不需要实现该函数,因为作为容器是“没有内容“的(但必须实现dispatchDraw()函数,告诉子view绘制自己)。
onLayout()
主要是为viewGroup类型布局子视图用的,在View中这个函数为空函数。
onMeasure()
用于计算视图大小(即长和宽)的方式,并通过setMeasuredDimension (width, height) 保存计算结果。
onTouchEvent()
定义触屏事件来响应用户操作。
还有一些不常用的方法:
onKeyDown() 当按下某个键盘时
onKeyUp() 当松开某个键盘时
onTrackballEvent() 当发生轨迹球事件时
onSizeChange() 当该组件的大小被改变时
onFinishInflate() 回调方法,当应用从XML加载该组件并用它构建界面之后调用的方法
onWindowFocusChanged(boolean) 当该组件得到、失去焦点时
onAttachedToWindow() 当把该组件放入到某个窗口时
onDetachedFromWindow() 当把该组件从某个窗口上分离时触发的方法
onWindowVisibilityChanged(int) 当包含该组件的窗口的可见性发生改变时触发的方法
View的绘制流程
绘制流程函数调用关系如下图:
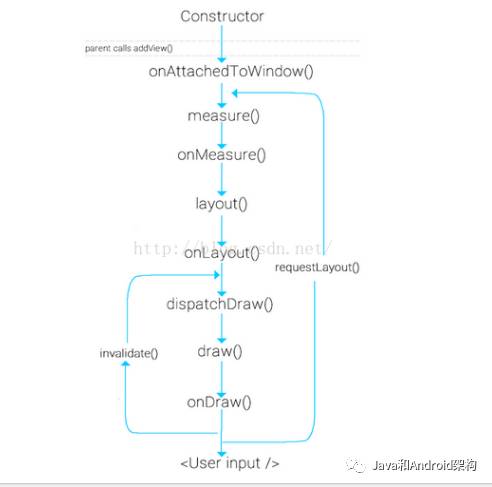
我们调用requestLayout()的时候,会触发measure 和 layout 过程,调用invalidate,会执行 draw 过程。
三.自定义控件的三种方式
1. 继承已有的控件
当要实现的控件和已有的控件在很多方面比较类似, 通过对已有控件的扩展来满足要求。
2. 继承一个布局文件
一般用于自定义组合控件,在构造函数中通过inflater和addView()方法加载自定义控件的布局文件形成图形界面(不需要onDraw方法)。
3.继承view
通过onDraw方法来绘制出组件界面。
四.自定义属性的两种方法
1.在布局文件中直接加入属性,在构造函数中去获得。
布局文件:
<RelativeLayout xmlns:android="http://schemas.android.com/apk/res/android"
    android:layout_width="match_parent"
    android:layout_height="match_parent"
    >
     <com.example.demo.myView
         android:layout_width="wrap_content"
         android:layout_height="wrap_content"
         Text="@string/hello_world"
         />
</RelativeLayout>
获取属性值:
public myView(Context context, AttributeSet attrs) {
    super(context, attrs);
    // TODO Auto-generated constructor stub
int textId = attrs.getAttributeResourceValue(null, "Text", 0);
String text = context.getResources().getText(textId).toString();
}
2.在res/values/ 下建立一个attrs.xml 来声明自定义view的属性。
可以定义的属性有:
<declare-styleable name = "名称">
//参考某一资源ID (name可以随便命名)
<attr name = "background" format = "reference" />
//颜色值
<attr name = "textColor" format = "color" />
//布尔值
<attr name = "focusable" format = "boolean" />
 //尺寸值
<attr name = "layout_width" format = "dimension" />
//浮点值
<attr name = "fromAlpha" format = "float" />
//整型值
<attr name = "frameDuration" format="integer" />
//字符串
<attr name = "text" format = "string" />
//百分数
<attr name = "pivotX" format = "fraction" />
//枚举值
<attr name="orientation"> <enum name="horizontal" value="0" />
<enum name="vertical" value="1" />
</attr>
//位或运算
<attr name="windowSoftInputMode">
<flag name = "stateUnspecified" value = "0" />
<flag name = "stateUnchanged" value = "1" />
</attr>
//多类型
<attr name = "background" format = "reference|color" />
</declare-styleable>- attrs.xml进行属性声明
<?xml version="1.0" encoding="utf-8"?>
<resources>
    <declare-styleable name="myView">
        <attr name="text" format="string"/>
        <attr name="textColor" format="color"/>
    </declare-styleable>
</resources>- 添加到布局文件
<RelativeLayout xmlns:android="http://schemas.android.com/apk/res/android"
    android:layout_width="match_parent"
    android:layout_height="match_parent"
    xmlns:myview="http://schemas.android.com/apk/com.example.demo"
    >
     <com.example.demo.myView
         android:layout_width="wrap_content"
         android:layout_height="wrap_content"
         myview:text = "test"
         myview:textColor ="#ff0000"
         />
</RelativeLayout>
这里注意命名空间:
xmlns:前缀=”http://schemas.android.com/apk/res/包名(或res-auto)”,
前缀:TextColor 使用属性。
- 在构造函数中获取属性值
public myView(Context context, AttributeSet attrs) {
        super(context, attrs);
        // TODO Auto-generated constructor stub
        TypedArray a = context.obtainStyledAttributes(attrs, R.styleable.myView);
        String text = a.getString(R.styleable.myView_text);
        int textColor = a.getColor(R.styleable.myView_textColor, Color.WHITE);
        a.recycle();
    }
或者:
    public myView(Context context, AttributeSet attrs) {
        super(context, attrs);
        // TODO Auto-generated constructor stub
        TypedArray a = context.obtainStyledAttributes(attrs, R.styleable.myView);
        int n = a.getIndexCount();
        for(int i=0;i<n;i++){
            int attr = a.getIndex(i);
            switch (attr) {
            case R.styleable.myView_text:
                break;
            case R.styleable.myView_textColor:
                break;
            }
        }
       a.recycle();
    }
五. 自定义随手指移动的小球(小例子)

实现上面的效果我们大致需要分成这几步:
– 在res/values/ 下建立一个attrs.xml 来声明自定义view的属性
– 一个继承View并复写部分函数的自定义view的类
– 一个展示自定义view 的容器界面
1.自定义view命名为myView,它有一个属性值,格式为color:
<?xml version="1.0" encoding="utf-8"?>
<resources>
    <declare-styleable name="myView">
        <attr name="TextColor" format="color"/>
    </declare-styleable>
</resources>
2.在构造函数获取获得view的属性配置和复写onDraw和onTouchEvent函数实现绘制界面和用户事件响应。
public class myView extends View{
//定义画笔和初始位置
Paint p = new Paint();
public float currentX = 50;
public float currentY = 50;
public int textColor;
public myView(Context context, AttributeSet attrs) {
super(context, attrs);
//获取资源文件里面的属性,由于这里只有一个属性值,不用遍历数组,直接通过R文件拿出color值
//把属性放在资源文件里,方便设置和复用
TypedArray array = context.obtainStyledAttributes(attrs,R.styleable.myView);
textColor = array.getColor(R.styleable.myView_TextColor,Color.BLACK);
array.recycle();
}
@Override
protected void onDraw(Canvas canvas) {
super.onDraw(canvas);
//画一个蓝色的圆形
p.setColor(Color.BLUE);
canvas.drawCircle(currentX,currentY,30,p);
//设置文字和颜色,这里的颜色是资源文件values里面的值
p.setColor(textColor);
canvas.drawText("BY finch",currentX-30,currentY+50,p);
}
@Override
public boolean onTouchEvent(MotionEvent event) {
currentX = event.getX();
currentY = event.getY();
invalidate();//重新绘制图形
return true;
}
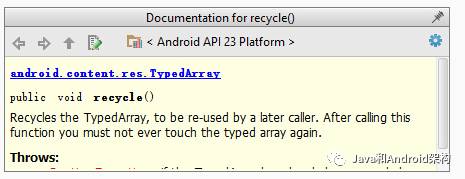
}这里通过不断的更新当前位置坐标和重新绘制图形实现效果,要注意的是使用TypedArray后一定要记得recycle(). 否则会对下次调用产生影响。
3.把myView加入到activity_main.xml布局里面
<?xml version="1.0" encoding="utf-8"?><RelativeLayout xmlns:android="http://schemas.android.com/apk/res/android"
    xmlns:tools="http://schemas.android.com/tools"
    android:layout_width="match_parent"
    android:layout_height="match_parent"
    xmlns:myview="http://schemas.android.com/apk/res-auto"
    android:paddingBottom="@dimen/activity_vertical_margin"
    android:paddingLeft="@dimen/activity_horizontal_margin"
    android:paddingRight="@dimen/activity_horizontal_margin"
    android:paddingTop="@dimen/activity_vertical_margin"
    tools:context="finch.scu.cn.myview.MainActivity">

    <finch.scu.cn.myview.myView
        android:layout_width="match_parent"
        android:layout_height="match_parent"
        myview:TextColor="#ff0000"
        />
</RelativeLayout>
4.最后是MainActivity
public class MainActivity extends AppCompatActivity {
    @Override
    protected void onCreate(Bundle savedInstanceState) {
        super.onCreate(savedInstanceState);
        setContentView(R.layout.activity_main);
    }
}
具体的view要根据具体的需求来,比如我们要侧滑删除的listview我们可以继承listview,监听侧滑事件,显示删除按钮实现功能。


- 随机文章
标签云集
-
jupyter
vue小技巧
docker命令
ios
javascript
Redis
nginx
Java
网页设计
APP设计参考
APP UI设计
树莓派
swoole
php
数据库
docker小技巧
设计灵感
mysql
zabbix
大数据可视化
vue
docker
android
页面设计
docker的使用
python
MySQL小知识
前端技术
交互设计
iphone x
webpack
app设计
react
adobe
linux
electron开发
PHP小技巧
移动端识别
css
ui设计
mysql优化
前端开发
golang小技巧
分布式
图标设计
设计教程
python插件
k8s
JavaScript小技巧
logo


